In November I had finished building the Qajaqpak and so had idle hands. My father and I had been working on a concept of an adaptable stitch and glue kayak design that would allow people to build a great sea kayak with limited funds and experience. Adaptability was key as we know that people come in all sorts of shapes and sizes, as well, perhaps more importantly, they come with all sorts of differing opinions as to what makes a great kayak for them.
We believe that the Inuit know a thing or two about what makes a great kayak. We are both drawn to the elegance of the west coast designs, especially those from the Disko Bay area. The elegantly rising bow and beautiful continuous sheer line are the epitome of a classic sea kayak. The hull design inspiration was the qajaq surveyed and documented in the book Kayaks of Greenland by Harvey Golden and listed as #65.

Image shared with permission of Harvey Golden
The first prototype was constructed in the UK over the summer when I visited my parents to introduce our girls to my home land. The design was named The Shrike, after the elegant bird. The shrike was built with a keyhole cockpit and a high foredeck to allow my father to board her easily (Dad has had total knee replacement surgery and lost some flexibility post-surgery).
So my idle hands were put to good use building a second prototype to ensure the hull patterns were accurate and also to demonstrate that the kayak could be adapted easily to individual needs (within limits). I like ocean cockpits. You may have noticed I am a little bit interested in Greenland rolling, so I wanted to modify the design to suit those two criteria. At the same time I wanted a kayak I could take on longer trips. So I was less focused on an out-and-out low-decked-roller and more on a blend of characteristics.
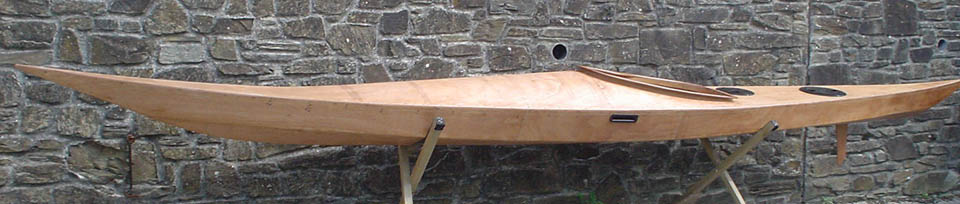
I named my design Shrike Too, I am English so humor tends to seep into just about everything I do. The Shrike Too design replaces the original higher foredeck with a lower profile deck, the keyhole cockpit was replaced with an ocean style cockpit and a hatch was added to the fore deck. The deck-lines and cockpit style change harkens back to the original Disko Bay qajaq which had a near circular cockpit. The Ocean style of cockpit puts the paddler’s thighs under the masik and provides continuous contact point between the paddler and the kayak, this is very helpful when rolling. The disadvantage is obviously a reduction in the ease of entry and exit from the kayak. By reducing the foredeck height the tortured ply foredeck buckles closer to the cockpit, this allows a far greater area of the foredeck to be flat than was possible in the original Shrike design. The extended flat area provides ample space to include a very usable foredeck hatch which makes the kayak more practical for loading and unloading camping gear etc.

The Shrike Too is built using the same hull panels and bulkheads as the Shrike. The variations come in the positioning and shape of the masik, the shape of the top of the forward bulkhead and the shape of the cockpit. These variations are now included in the Shrike plans.
I decided to make my life slightly harder by not using any screws anywhere in the build. I am not sure why I thought this was a good idea, perhaps I was concerned with the visibility of the screw holes? The first hurdle to overcome was the carlines. I purchased bags of really cheap plastic clamps and applied literally a hundred to each carline. They worked great so don’t be afraid to take this approach if you have access to lots of clamps (and I do mean lots).
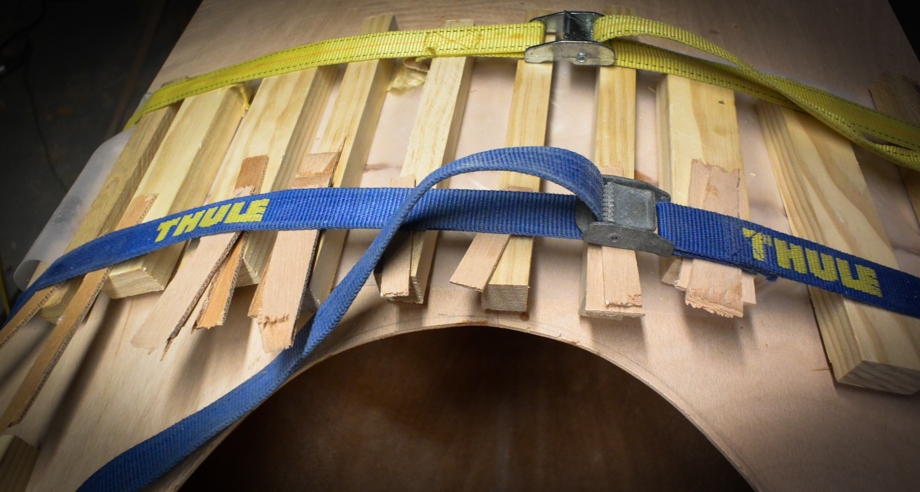
The real challenge with the screw-less approach is the deck. The foredeck was relatively easy just lots of straps and weights. The crux was the mating joint between the stern deck and the foredeck just in front of the cockpit. The angles and torsion on the ply make it like trying to tame a python. I ended up with a decent fit and finish. Using slow setting epoxy was a great thing here as I was able to move the wood around and adjust clamps without have the pressure of quick setting epoxy. The solution I came up with was to use a lot of small pieces of plywood to act as wedges to force the decks flat at the joint. I used a strap on each side of the joint to apply force to the spanning one inch wide wood supports and then jammed plywood shards under each strap until the pressure was even and the gap normalized across the joint. I ended up with only about 1/32” variation across the joint. I dry fitted it once and then went for it. I only focused on this joint once I had the rest of the deck strapped in place and weighted down. I did have to adjust the straps at the rear of the cockpit once as the twists in the plywood varied the gap at the joint and I needed to normalize it. But the slow setting epoxy gave me plenty of time to deal with that.
When you look at the daunting task of building a kayak there are so many dimensions you could worry about and fuss with until they are perfect. With the Shrike the real things to focus on are the hull panels. Once then are done and the carlines are in place the hull is the hull you won’t be altering its shape, it is done. The only area that matters “upstairs” is where you end up sitting and where that places your knees. I focused first on identifying where I would be sitting. I then placed the hull on the ground resting on cushions and very gently sat inside it. By doing this I was able to identify where I wanted the masik, or deck beam. Unlike the first shrike I defined the position of the deck beam based upon my body rather than the size of the plywood. It would be possible to do it both ways by using two deck beams, one for the plywood joint and the other for the knee beam (masik) but I decided it would be simpler to slide the plywood aft to the position of the beam leaving a small triangle at the bow rather than attempt to construct and align two curved deck beams.
The other critical measurements are the deck height and cockpit length, and they are related. You need to decide upon one and the other is derived from it. I chose a cockpit length of 19inches I then used my body to decided how high the deck would need to curve to allow my knees to get under the deck at the front of the cockpit while my butt was sitting on the back of the cockpit rim (which remember will be slightly raised above the deck). This sounds complicated but it isn’t really. I sat on a plank straddling the stern deck and I rested another across where the masik was going. I was then able to adjust it and approximate how much clearance I needed (2.5”).

I drew the smaller cockpit shape by eye. I measured my hip width and approximated the shape of my back. I used a big paint can to draw around to create smooth round corners and at the front and then just sketched until I liked the shape. I knew the approximate width and length I wanted, and I also knew I wanted the circumference to be similar to my other cockpits so that my tuilik would seal well. An advantage of the smaller cockpit is that your thighs are entirely under the deck providing ample opportunity to grip the kayak and stay in touch with it while rolling or paddling in rough waters. The disadvantage is the entry and exit is harder. You have to sit on the stern deck and slide into the kayak, there is no butt first entry with this style of cockpit so you need to have good balance, or always seal launch.
The Shrike Too masik is substantially lower than the original Shrike design. This caused the foredeck to buckle closer to the cockpit and with a much less noticeable transition. The first three feet of the foredeck were flat gunwale to gunwale. The flat area was perfect for a nice eight inch round hatch, I could have fitted an even bigger one. By fitting a foredeck hatch it gave me access to the inside of the forward bulkhead which allowed me to add even more strength to it with tape around the deck edge. It also allowed me to go a little crazy with my approach to the deck lines.

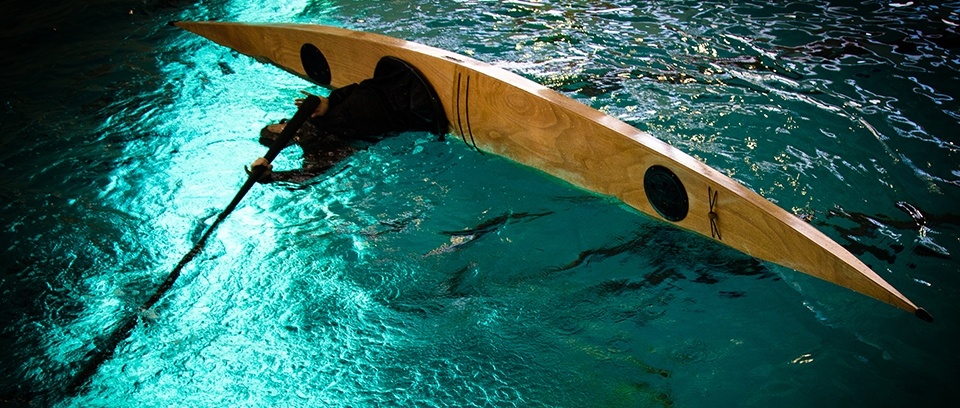
When I was building Shrike Too I was not convinced that my wood work skills would be good enough for me to want to keep the hull and deck clear coated. I had expected to make so many mistakes that I would need to paint over them. Through luck and good fortune I ended up with a hull that I am leaving clear coated. I decided I wanted to create a very sleek look with only enough deck lines for the purpose of the kayak, basically a rolling training and weekend tripping kayak. A couple of people advised me to look into Maroske deck fittings. These deck fittings are much easier to do before you fix the deck in place. It was only possible for me to retrospectively do them because I had a foredeck hatch. The level of effort to do these was high, but I am glad I did it. I won’t bore you by repeating the instruction for Maroske fittings, I recommend you do a web search, read a bit and watch some videos, they are time consuming but rewarding. I hope you agree the end result is rather sleek.
The Shrike Too rolls well, the back deck is higher than a dedicated rolling kayak like the Ivalu or Zegul Greenland but this doesn’t stop her rolling comfortably. I have had limited time in her so far due to the spring thaw being a few months away. The hull has considerable rocker which make her turn nicely, yet her long bow and stern help her track in a straight line when desired. The addition of the integrated skeg should deal with any weather helm the wind may cause. Her pedigree suggests though that she will be like those other Disko Bay derivatives like the Anas Acuta and be a delight to paddle in waves. I look forward to getting her afloat on Lake Superior this Spring and experience her in the conditions she is meant to be paddled in.
The Shrike and Shrike Too derivative design and build manuals are available for free download from CNC Kayaks here, additionally we are able to ship paper templates for the hull, bulkheads and all other major components of the design making her a very simple construction project. I had never previously built any stitch and glue designs, the Shrike Too took me two months of occasional evenings to build, a very low level of effort for such a rewarding kayak.
We would be delighted if you would consider building the Shrike or Shrike Too or deriving your own version from our plans.


